October 28, 2022
With Halloween just around the corner, we decided to carve some pumpkins to display. With that in mind, we gathered our pumpkin carving supplies, put on some spooky tunes and got to work. If you’re planning on carving pumpkins for Halloween, follow these easy steps:
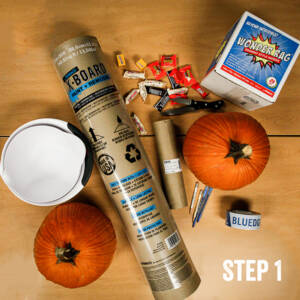
Gather your materials and set up your surface protection. Whether you’re carving indoors or outdoors, surface protection will make cleaning up a breeze. If you’re using a table, tape your surface protector down with a low-tack adhesive tape like our Blue Painter’s Tape.
Materials needed:
Optional:
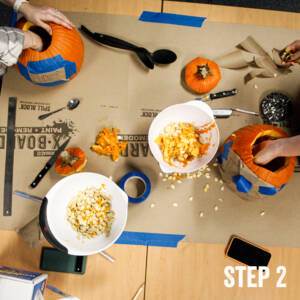
Start carving your pumpkin by cutting the top or bottom off to create an opening. Use a spoon or pumpkin scraping tool to remove all of the seeds and slime. Set the seeds aside in a bowl if you want to roast them later!
Use a marker or pen to draw the outline of your design to create a stencil. You can draw a face, a ghost, or other design on a thin sheet of paper, such as Trimaco’s Masking Paper. Make sure your design is the right size for your pumpkin.
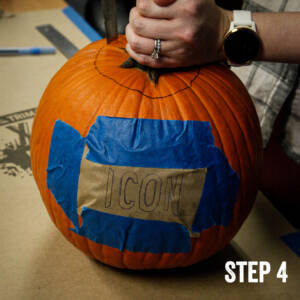
Tape your stencil to the pumpkin. Use a knife or the poker tool that comes in a pumpkin carving kit to poke holes through the stencil and into the pumpkin.
Remove the stencil. Use a knife to cut along the lines you poked. As you cut, remove pieces of pumpkin as needed. Using a pumpkin carving kit with a small, serrated knife would work best.
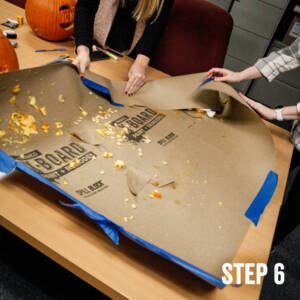
Once your pumpkin is carved, clean up the space. Clean up is easy and hassle-free when using a surface protector like X-Board — just roll it up and throw it away.
Grab a candle and display your pumpkin. If you cut the top of the pumpkin off, place the candle inside. If you cut off the bottom, you can set the pumpkin down on top of the candle.
Either way, you now have a spooky or fun pumpkin to display for Halloween!

If you’re looking for other fun Halloween decorating how-tos, why not try a DIY SuperTuff Cheesecloth Ghost!


Get Social
3 days ago
Video
Share on Facebook Share on Twitter Share on LinkedIn Share by Email
7 days ago
Video
Share on Facebook Share on Twitter Share on LinkedIn Share by Email
1 week ago
Video
Share on Facebook Share on Twitter Share on LinkedIn Share by Email
2 weeks ago
Photo
Share on Facebook Share on Twitter Share on LinkedIn Share by Email
2 weeks ago
Video
Share on Facebook Share on Twitter Share on LinkedIn Share by Email
Cling Cover is premium plastic sheeting clings to almost any surface, attracting overspray and keeping your workspace clean, bright, and protected.
2#trimaco #totaljobsiteprotection #savetimesavemoney #work #paint #painting #construction #constructionproducts #build #buildzoom
Prepping for renovation with Easy Mask Tape & Drape 🚨🚨
@refreshhomeimprovements
#trimaco #totaljobsiteprotection #savetimesavemoney #work #paint #painting #construction #constructionproducts #build #buildzoom #building #homebuild
Refresh your kitchen on a budget with an easy DIY backsplash ✨
4Check out our latest blog for a step by step guide: https://trimaco.com/blog/how-to-diy-a-kitchen-backsplash/
#trimaco #totaljobsiteprotection #savetimesavemoney #work #paint #painting #construction #constructionproducts #build #buildzoom
Highly absorbent and reusable, Trimaco’s Wonder Rag is your go-to for a spotless finish
2#trimaco #totaljobsiteprotection #savetimesavemoney #work #paint #painting #construction #constructionproducts #build #buildzoom #building #homebuild