July 22, 2020
It is officially summer, which means there is no better time to get started on DIY projects. If you want to spruce up the decor of your home or office, create your own one-of-a-kind canvas wall art! With a Trimaco canvas drop cloth and a handful of materials available at your local craft store, you can build, design and paint multiple canvas wall art pieces in only a few hours. This is a fun, creative, at-home project to do with friends, family or by yourself!
First, measure your wooden canvas frame to determine the size of your art piece. You should cut your SuperTuff Drop Cloth so that it is larger than the frame – we recommend adding at least three inches.
Once the canvas is cut, stretch it around the frame and make sure it is positioned evenly. Next, staple the canvas onto the back side of the wooden frame. The canvas should be tight and smooth. You can then cut off any additional fabric.
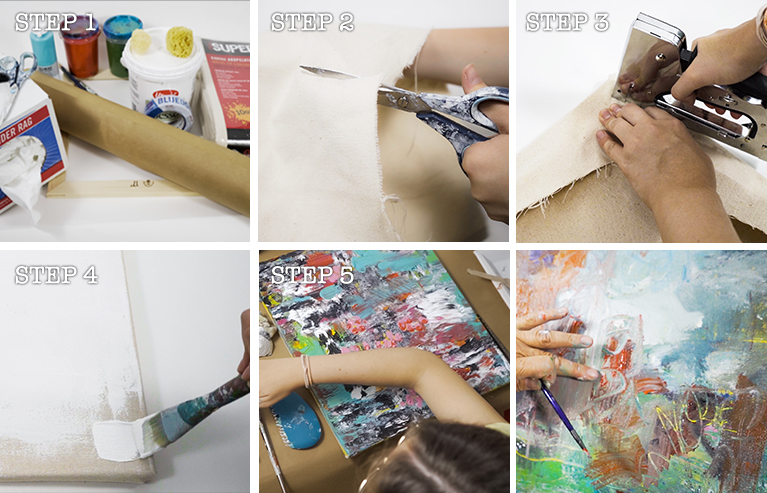
Place your leftover drop cloth or the Trimac X-Paper Surface Protector under your canvas. Use a larger paint brush to coat the entire canvas in gesso primer.
Priming your canvas creates a smooth surface, prevents paint absorption and makes your paint colors pop. You can dilute the primer with water to create a thinner coat. Let the primer dry.
Time to get creative: gather your acrylic paint and any additional art materials you want to use for your art piece. You can seek inspiration online or come up with an original piece. Let your canvas painting dry for at least a day. Once it is dry, hang up your art and enjoy! For more How-To and DIY projects, like DIY canvas prints or a DIY dust barrier, check out Trimaco’s blog.


Get Social
3 months ago
Video
Share on Facebook Share on Twitter Share on Linked In Share by Email
3 months ago
Video
Share on Facebook Share on Twitter Share on Linked In Share by Email
3 months ago
Photo
Share on Facebook Share on Twitter Share on Linked In Share by Email
3 months ago
Video
Share on Facebook Share on Twitter Share on Linked In Share by Email
3 months ago
Video
Share on Facebook Share on Twitter Share on Linked In Share by Email
Cling Cover is premium plastic sheeting clings to almost any surface, attracting overspray and keeping your workspace clean, bright, and protected.
2#trimaco #totaljobsiteprotection #savetimesavemoney #work #paint #painting #construction #constructionproducts #build #buildzoom
Prepping for renovation with Easy Mask Tape & Drape 🚨🚨
@refreshhomeimprovements
#trimaco #totaljobsiteprotection #savetimesavemoney #work #paint #painting #construction #constructionproducts #build #buildzoom #building #homebuild
Refresh your kitchen on a budget with an easy DIY backsplash ✨
4Check out our latest blog for a step by step guide: https://trimaco.com/blog/how-to-diy-a-kitchen-backsplash/
#trimaco #totaljobsiteprotection #savetimesavemoney #work #paint #painting #construction #constructionproducts #build #buildzoom
Highly absorbent and reusable, Trimaco’s Wonder Rag is your go-to for a spotless finish
2#trimaco #totaljobsiteprotection #savetimesavemoney #work #paint #painting #construction #constructionproducts #build #buildzoom #building #homebuild