October 7, 2021
Photo canvas prints are an easy, economical way to spruce up your current home decor. This do it yourself project can add a personal touch and showcase your favorite memories to your home or office space. Follow the steps below to create beautiful canvas photo prints with just a few supplies.
Before jumping into this DIY project, take the time to prep your space to avoid a mess. Lay a Trimaco Stay Put Canvas Drop Cloth on the surface you’ll be working on. Since we’ll be painting, this drop cloth will provide leak-resistant protection, preventing any paint from seeping through onto the surface.
Measure your wooden frame to determine what size photo you need. We used 8×10 wooden frames, for a 8×10 photo. Next, Cut the 10oz canvas drop cloth just slightly larger than the frame. We recommend cutting the canvas drop roughly 1-2 inches larger than the frame. Lastly, stretch the canvas around the frame and staple into place. Be sure that the canvas is nice and tight!
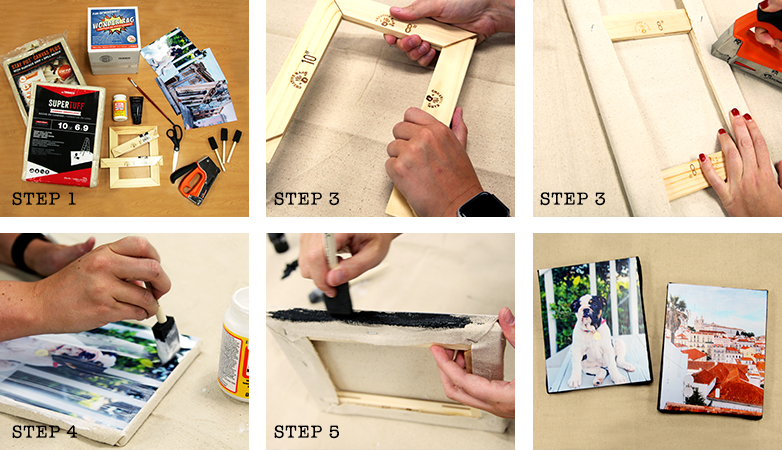
Brush on a layer of modge podge onto the canvas surface. Carefully place your photo on the canvas frame. Flip the frame over and smooth the photo into place, removing any bubbles. Flip the frame back over and add an additional layer of mod podge on top of your image. This layer will help add texture to your image.
*Let this layer dry completely before moving to the next step
This step is optional! But to give your canvas print a more finished look, add a painted border to the edges of the frame. We used a black acrylic paint, but any color will do! Keep Trimaco’s Wonder Rags handy for any mistakes.
Once your border is complete, let your canvas print dry, hang and enjoy!
These DIY canvas photo prints are a great way to display your favorite photos, without breaking the bank. Looking for more home projects? Explore Trimaco’s full blog!


Get Social
6 days ago
Video
Share on Facebook Share on Twitter Share on LinkedIn Share by Email
1 week ago
Video
Share on Facebook Share on Twitter Share on LinkedIn Share by Email
2 weeks ago
Video
Share on Facebook Share on Twitter Share on LinkedIn Share by Email
3 weeks ago
Video
Share on Facebook Share on Twitter Share on LinkedIn Share by Email
3 weeks ago
Video
Share on Facebook Share on Twitter Share on LinkedIn Share by Email
Cling Cover is premium plastic sheeting clings to almost any surface, attracting overspray and keeping your workspace clean, bright, and protected.
2#trimaco #totaljobsiteprotection #savetimesavemoney #work #paint #painting #construction #constructionproducts #build #buildzoom
Prepping for renovation with Easy Mask Tape & Drape 🚨🚨
@refreshhomeimprovements
#trimaco #totaljobsiteprotection #savetimesavemoney #work #paint #painting #construction #constructionproducts #build #buildzoom #building #homebuild
Refresh your kitchen on a budget with an easy DIY backsplash ✨
4Check out our latest blog for a step by step guide: https://trimaco.com/blog/how-to-diy-a-kitchen-backsplash/
#trimaco #totaljobsiteprotection #savetimesavemoney #work #paint #painting #construction #constructionproducts #build #buildzoom
Highly absorbent and reusable, Trimaco’s Wonder Rag is your go-to for a spotless finish
2#trimaco #totaljobsiteprotection #savetimesavemoney #work #paint #painting #construction #constructionproducts #build #buildzoom #building #homebuild