December 5, 2018
DIY with Trimaco (Tri DIY with us!)
Christmas is finally here and the holiday spirit is in full swing at Trimaco! Every year we take time to decorate the office and celebrate the season. This year, we used some of our own products to make simple, yet festive X-Paper Christmas trees. These are perfect for any lobby, desk or hearth needing a little extra sparkle. Follow these simple steps to create your own X-Paper holiday paper tree:
Materials needed:

Directions:
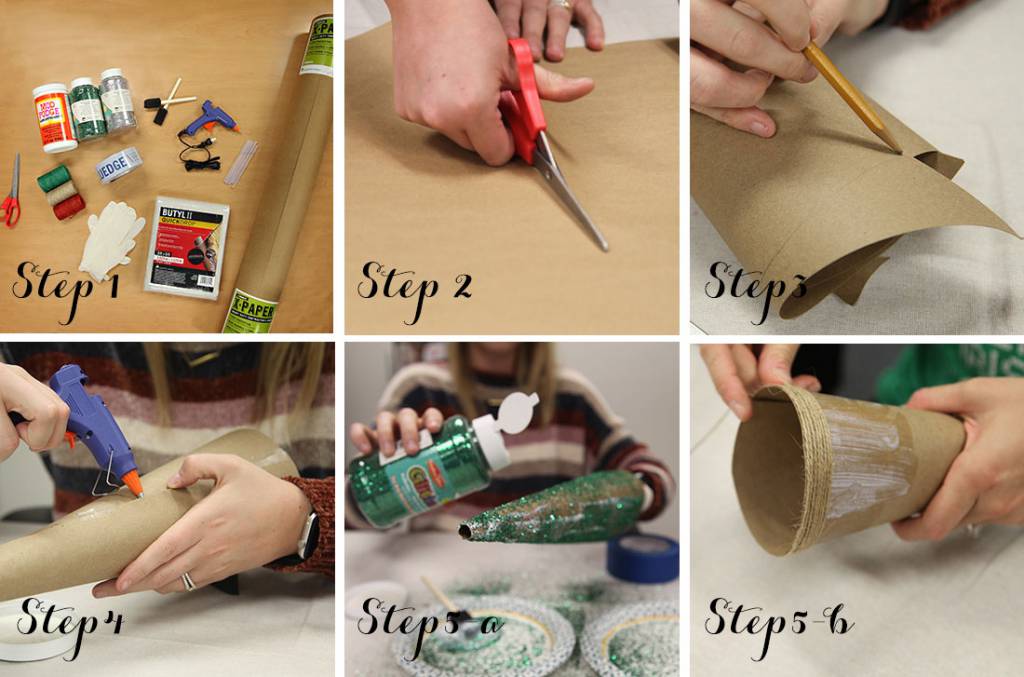
- First gather your materials and lay down a Trimaco 5 x 5 Butyl II dropcloth to contain the mess (mainly the glitter) and make clean up a breeze.
- Next, plan out how many trees you want to design, how large you want them and what decorations you want to utilize.
- Measure out a triangle on the X-Paper (this depends on the size tree you want-we did two 1.5-foot triangles, and two smaller ones). Cut out your triangle, rounding out the bottom to create the cone shape of the tree.
- Secure the cones with Trimaco’s KleenEdge Low Tack Tape on the inside and reinforce with the hot glue along the seams.
- Once your cone is stable and secure, begin decorating your paper tree! We tried a few different styles:
a. For a more dramatic look, apply a coat of Mod Podge with a foam brush and sprinkle the glitter (we recommend wearing gloves when applying). Trimaco’s ProPerfect Wipers are very helpful for clean-up in between trees.
b. For a rustic look, apply a coat of Mod Podge with a foam brush and wind twine around the cone all the way to the top.
c. For a more modern look with straight lines, simply apply double sided tape to your cone, and roll in glitter.
- Let the first layer of decorations dry, and continue to add any finishing touches such as twine-garland, bows, stars, etc.
- Once dry, display and enjoy!
Tricks we learned along the way
- To keep the cone in place, use double sided tape, then reinforce with hot glue and KleenEdge Low Tack Tape on the inside.
- Make sure you plug in your hot glue gun at the beginning of your project so it is ready to go when needed!


Get Social
1 week ago
Video
Share on Facebook Share on Twitter Share on Linked In Share by Email
2 weeks ago
Video
Share on Facebook Share on Twitter Share on Linked In Share by Email
2 weeks ago
Video
Share on Facebook Share on Twitter Share on Linked In Share by Email
4 weeks ago
Video
Share on Facebook Share on Twitter Share on Linked In Share by Email
7 months ago
Video
Share on Facebook Share on Twitter Share on Linked In Share by Email
Cling Cover is premium plastic sheeting clings to almost any surface, attracting overspray and keeping your workspace clean, bright, and protected.
2#trimaco #totaljobsiteprotection #savetimesavemoney #work #paint #painting #construction #constructionproducts #build #buildzoom
Prepping for renovation with Easy Mask Tape & Drape 🚨🚨
@refreshhomeimprovements
#trimaco #totaljobsiteprotection #savetimesavemoney #work #paint #painting #construction #constructionproducts #build #buildzoom #building #homebuild
Refresh your kitchen on a budget with an easy DIY backsplash ✨
4Check out our latest blog for a step by step guide: https://trimaco.com/blog/how-to-diy-a-kitchen-backsplash/
#trimaco #totaljobsiteprotection #savetimesavemoney #work #paint #painting #construction #constructionproducts #build #buildzoom
Highly absorbent and reusable, Trimaco’s Wonder Rag is your go-to for a spotless finish
2#trimaco #totaljobsiteprotection #savetimesavemoney #work #paint #painting #construction #constructionproducts #build #buildzoom #building #homebuild