August 29, 2019
September means goodbye summer and hello real world. As kids head back to school, and we get back into the groove of our regular schedules, it can be tough to transition into a rigid routine again. To-do lists can help get back into that routine and can be fun, especially when they are displayed on a wall mounted paper roll!
This quick DIY mounted paper roller is an easy way to create interactive to-do lists, grocery lists, fun notes to friends and family or any other notes that can be displayed in an office or home.
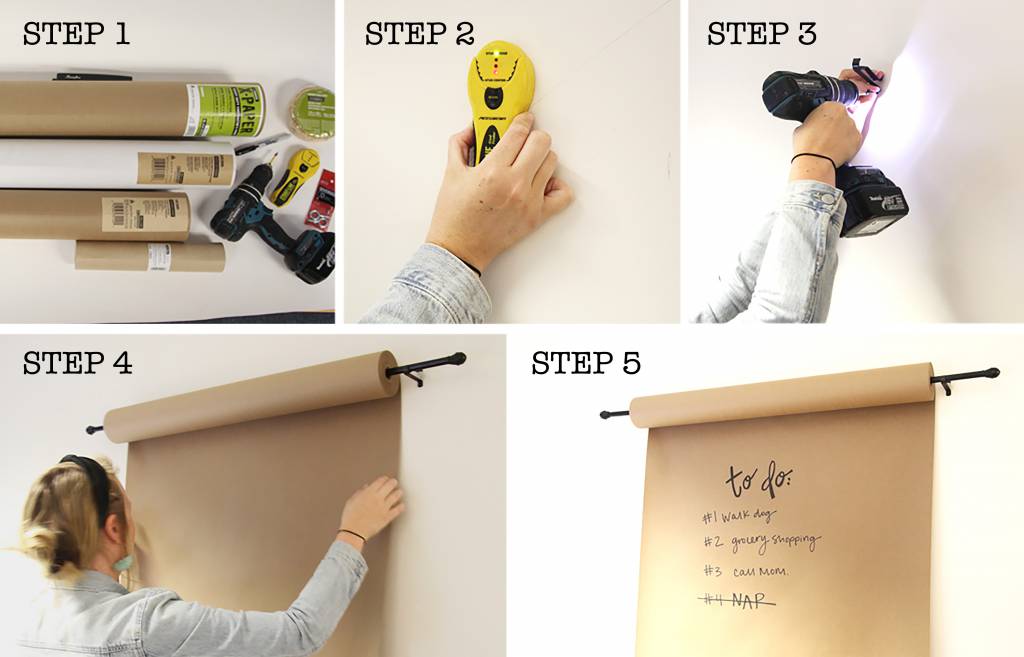
We’ve compiled these simple steps to mount a roll of kraft paper, white paper and even small masking paper.
Use the stud finder to find an area on your surface to mount. After the studs are found, measure and mark the height and width you want your studio roller to be. We chose to give our paper rolls about an inch of space on either side of the supportive screws.
After you have measured and decided where to mount, go ahead and screw in the supportive curtain rod hangers.
Once your mount is in place, thread the curtain rod through the middle opening of the paper roll.
Place your paper roll/curtain rod in the wall mount. Once stable, pull the kraft paper down as far as desired to create an area you can begin utilizing. *We recommend positioning the roll so the extra paper is being pulled from behind (rather on top), to ensure a smooth writing surface.
Once mounted, go ahead and put your new addition to use! Create to do lists, grocery lists, etc.
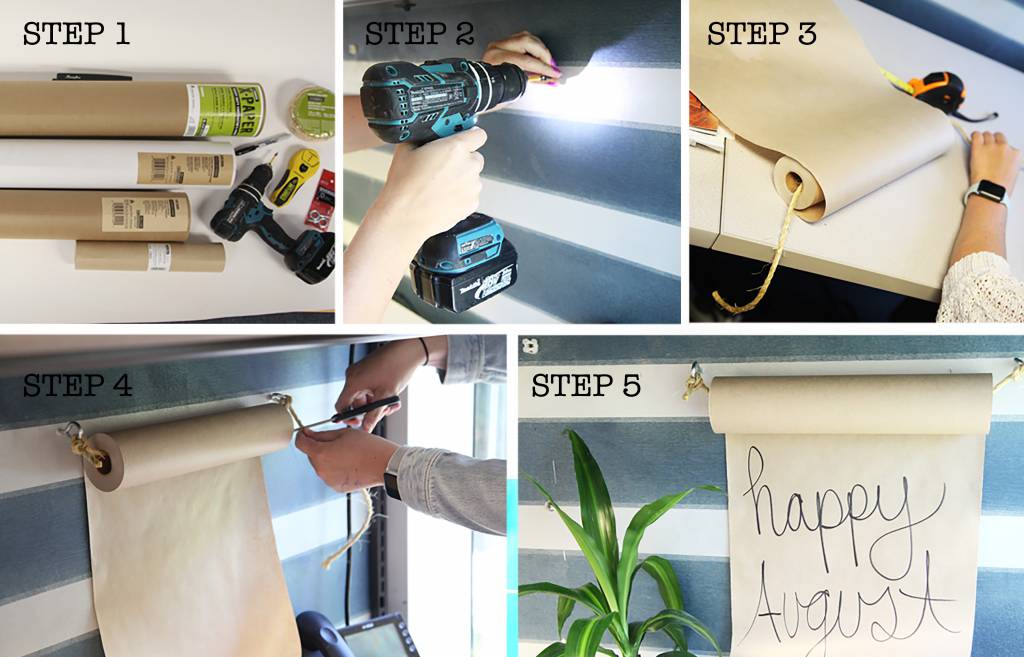
Love the look of the paper mount, but don’t have quite enough space? No worries! Replace the builder’s paper with a smaller roll of masking paper (we used a 12” brown masking paper), and replace the curtain rod with a piece of rope and two two screw eyes.
To install, simply follow the steps above, but install the screw eyes to your desired spot, thread the rope through the masking paper roll and tie the rope to the screw eye openings.
There are quite a few ways to build a kraft paper wall mount. We chose these two options because they are both economical, only require one trip to your local hardware store, and they are quick and easy to complete. Do you have another brown paper mount design? Feel free to share below!


Get Social
6 days ago
Video
Share on Facebook Share on Twitter Share on LinkedIn Share by Email
1 week ago
Photo
Share on Facebook Share on Twitter Share on LinkedIn Share by Email
2 weeks ago
Video
Share on Facebook Share on Twitter Share on LinkedIn Share by Email
2 weeks ago
Video
Share on Facebook Share on Twitter Share on LinkedIn Share by Email
3 weeks ago
Video
Share on Facebook Share on Twitter Share on LinkedIn Share by Email
Cling Cover is premium plastic sheeting clings to almost any surface, attracting overspray and keeping your workspace clean, bright, and protected.
2#trimaco #totaljobsiteprotection #savetimesavemoney #work #paint #painting #construction #constructionproducts #build #buildzoom
Prepping for renovation with Easy Mask Tape & Drape 🚨🚨
@refreshhomeimprovements
#trimaco #totaljobsiteprotection #savetimesavemoney #work #paint #painting #construction #constructionproducts #build #buildzoom #building #homebuild
Refresh your kitchen on a budget with an easy DIY backsplash ✨
4Check out our latest blog for a step by step guide: https://trimaco.com/blog/how-to-diy-a-kitchen-backsplash/
#trimaco #totaljobsiteprotection #savetimesavemoney #work #paint #painting #construction #constructionproducts #build #buildzoom
Highly absorbent and reusable, Trimaco’s Wonder Rag is your go-to for a spotless finish
2#trimaco #totaljobsiteprotection #savetimesavemoney #work #paint #painting #construction #constructionproducts #build #buildzoom #building #homebuild