
May 22, 2020
As Covid-19 continues to affect our everyday lives, health officials state that we should continue practicing social distancing. In an effort to flatten the curve and slow the spread of the virus, we should prepare for a new normal for the foreseeable future.
As large gatherings such as concerts, sporting events and performances have been cancelled and postponed we continue to look for more at-home activities. Although not live, we can stream these events in the comfort of our own home. What better way to enjoy streaming events or watching a classic movie than on a large, outdoor movie screen? Trimaco has you covered!
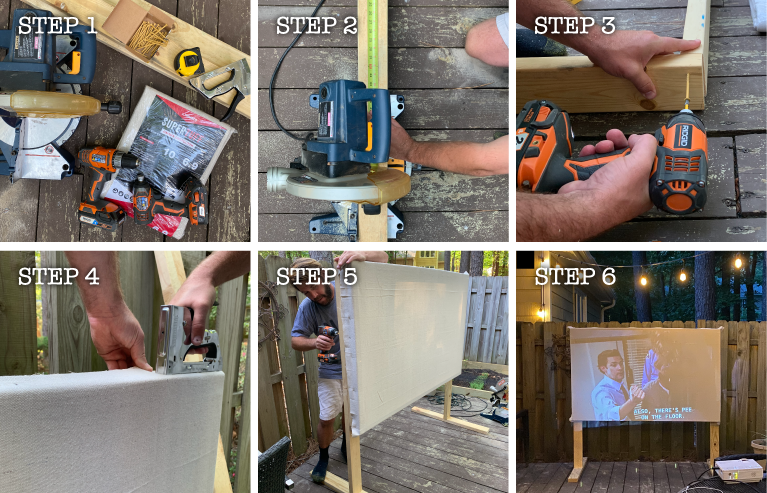
Build your own at-home, outdoor movie theater with a Trimaco canvas drop cloth! We’ve compiled the tools and steps needed for a perfect family outdoor activity:
Before breaking out the saw, decide what size movie screen will best fit in your outdoor space, and choose the appropriate canvas drop cloth size. Once you have an idea of your screen size, measure and cut the 2×4 Whitewood Studs with the miter saw. We designed a 3-ft x 5-ft screen.
Once these pieces have been cut, go ahead and cut your legs and feet too. For the legs, simply add 2-3 additional feet to your movie screen height. For example, our height was 3-feet, so we measured and cut two 5-foot pieces. For the feet, two 1-foot pieces will work just fine.
After cutting all necessary pieces, lay them out and simply begin screwing them together. Hold off on adding the legs and feet until after the canvas is in place.
Once your frame is complete, take the Trimaco canvas drop cloth and drape it over the frame (don’t worry about having too much fabric, you can trim the edges once it’s stapled down.)
While holding the canvas in place, staple the canvas onto the frame, keeping the canvas tight. We found it was best to have one person keep the canvas tightly in place, while another person stapled it onto the frame.
Once the canvas is in place, cut off the additional fabric from the edges.
Screw the legs to the back side of the screen (canvas should be facing outward!). Lastly, screw the 1-foot pieces perpendicular to the legs to create the feet.
Once your screen is finished, power up the projector, make a tub of popcorn and enjoy! This outdoor movie theater is perfect for family movie nights, date nights, tailgates and more.
Although we have made progress in slowing the speed of Covid-19, social distancing will continue to be the new normal for the foreseeable future. Take the time to dive into new hobbies, check off home improvement projects and enjoy the slow pace with your immediate household. Have a unique quarantine project of your own? Share it with us!


Get Social
5 months ago
Video
Share on Facebook Share on Twitter Share on Linked In Share by Email
5 months ago
Video
Share on Facebook Share on Twitter Share on Linked In Share by Email
5 months ago
Photo
Share on Facebook Share on Twitter Share on Linked In Share by Email
5 months ago
Video
Share on Facebook Share on Twitter Share on Linked In Share by Email
5 months ago
Video
Share on Facebook Share on Twitter Share on Linked In Share by Email
Cling Cover is premium plastic sheeting clings to almost any surface, attracting overspray and keeping your workspace clean, bright, and protected.
2#trimaco #totaljobsiteprotection #savetimesavemoney #work #paint #painting #construction #constructionproducts #build #buildzoom
Prepping for renovation with Easy Mask Tape & Drape 🚨🚨
@refreshhomeimprovements
#trimaco #totaljobsiteprotection #savetimesavemoney #work #paint #painting #construction #constructionproducts #build #buildzoom #building #homebuild
Refresh your kitchen on a budget with an easy DIY backsplash ✨
4Check out our latest blog for a step by step guide: https://trimaco.com/blog/how-to-diy-a-kitchen-backsplash/
#trimaco #totaljobsiteprotection #savetimesavemoney #work #paint #painting #construction #constructionproducts #build #buildzoom
Highly absorbent and reusable, Trimaco’s Wonder Rag is your go-to for a spotless finish
2#trimaco #totaljobsiteprotection #savetimesavemoney #work #paint #painting #construction #constructionproducts #build #buildzoom #building #homebuild