December 14, 2022
Sound abatement is soundproofing materials that absorbs vibrations and reduce noise problems to create a quiet and peaceful space. Various material types and installation techniques can be used to achieve sound abatement. Typically, we see absorbent sound insulation materials installed under floors, behind walls, or on top of ceiling tiles.
Whether you’re soundproofing a room to keep noise out or in, Trimaco and United Plastics have teamed up to provide a full line of sound abatement solutions. Our line of sound barriers can be used as an underlayment, behind finished walls and placed above ceiling tiles in commercial spaces to create quiet, calming, and comfortable spaces.
When soundproofing a room, it’s best to plan prior to construction and to include it in your specs. Our sound barrier noise control products are installed behind and under permanent materials, such as wall panels, acoustical enclosures, and more. Therefore should be integrated early on.
We’ve broken out each area of a room that can utilize absorptive noise barriers and will walk you through how to install each option.
Trimaco and United Plastics offer two types of sound-absorbing underlayments. dB4 lite is designed with resilient polyester fibers, and a leak-resistant polyethylene film and is ideal for both residential and commercial uses. dB4 Max is a heavier option, and is designed with a mass-loaded material attached to a polyester fiber layer- making this the obvious choice for commercial use.
For more specifics on unique installation scenarios, check out our installation guide here.
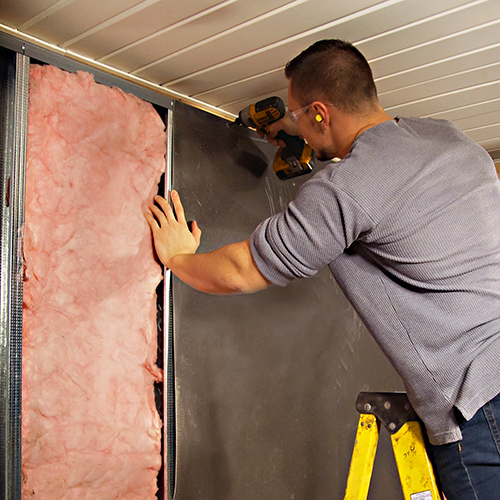
Sound barrier walls are acoustic products designed to absorb and block high noise levels from indoor or outdoor machinery and equipment. Similar to dB4, United plastic offers a line of dB3 options for walls. dB3, dB3 Lite, and dB3 Max are all designed with mass-loaded POE, are flexible, and are environmentally friendly. dB3, and dB3 Lite are great for residential and some commercial applications, while dB3 max is great for both commercial and industrial uses.
For more specifics on unique installation scenarios, check out our installation guide here.
For a completely soundproofed space, the last sound abatement material needed is the dB Top Stop for ceilings. Similar to dB3 and dB4, Top Stop is designed with a multiple-layer POE acoustical ceiling material. The sound-absorbing tiles are pre-cut into 2-foot x 2-foot tiles for easy installation.
For more specifics on installation, check out our installation guide here.
Getting rid of unwanted noise doesn’t have to be difficult. With the help of United Plastics dB3, dB4, and Top Stop materials, it’s quick and easy to create a calm, quiet environment. For more information on soundproofing products, check out Trimaco’s full line.


Get Social
5 days ago
Video
Share on Facebook Share on Twitter Share on LinkedIn Share by Email
1 week ago
Video
Share on Facebook Share on Twitter Share on LinkedIn Share by Email
2 weeks ago
Video
Share on Facebook Share on Twitter Share on LinkedIn Share by Email
2 weeks ago
Video
Share on Facebook Share on Twitter Share on LinkedIn Share by Email
3 weeks ago
Video
Share on Facebook Share on Twitter Share on LinkedIn Share by Email
Cling Cover is premium plastic sheeting clings to almost any surface, attracting overspray and keeping your workspace clean, bright, and protected.
2#trimaco #totaljobsiteprotection #savetimesavemoney #work #paint #painting #construction #constructionproducts #build #buildzoom
Prepping for renovation with Easy Mask Tape & Drape 🚨🚨
@refreshhomeimprovements
#trimaco #totaljobsiteprotection #savetimesavemoney #work #paint #painting #construction #constructionproducts #build #buildzoom #building #homebuild
Refresh your kitchen on a budget with an easy DIY backsplash ✨
4Check out our latest blog for a step by step guide: https://trimaco.com/blog/how-to-diy-a-kitchen-backsplash/
#trimaco #totaljobsiteprotection #savetimesavemoney #work #paint #painting #construction #constructionproducts #build #buildzoom
Highly absorbent and reusable, Trimaco’s Wonder Rag is your go-to for a spotless finish
2#trimaco #totaljobsiteprotection #savetimesavemoney #work #paint #painting #construction #constructionproducts #build #buildzoom #building #homebuild